How to create and sign PSBT transactions
With Cuvex, you're not only securing your seed phrase you're also getting your BTC air-gapped hardware wallet.


Step Nº1

Create your wallet with Dice and Coin.
Do you completely trust your current seed? Did you create it with true entropy, or was your seed created by others?
Cuvex helps you by simplifying the sovereign creation of your seed. Our Create seed function delegates the entropy to the Coin and Dice method, requiring your direct participation in the process.
There is no safer and higher entropy way than this to create a seed with the best procedure.
We have only loaded the dictionary of the BIP 39 standard and implemented the algorithm for calculating the Hash of word 24.
That is, we delegate to you the 100% important and unique part of the generation of the first 23 words and we simplify the cold creation process without an internet connection and without depending on third parties.
Don't assume that the quality of your seed is perfect if you haven't participated in the entropy of its creation yourself.
Let's get started!

To begin, you will need one blank Cuvex NFC card, four dice of different colors, and a coin.
Click on the "Create W" button and check the four boxes corresponding to the colors of your dice. For this example, we will always use white for die 1, black for die 2, red for die 3, and blue for die 4. In your case, the order will depend on the colors of the dice you use.

Let's begin! Flip the coin and select whether it landed on heads or tails. Next, roll the four dice and enter the number rolled for each die in the box corresponding to its color. You'll see the resulting word below the combination of the four numbers; this word has been generated 100% randomly.
Repeat this process 23 times. It's crucial to perform each step correctly—flipping the coin and rolling the four dice for all 23 rounds—to achieve good entropy.
This method ensures a high level of security by incorporating true randomness through physical actions, enhancing the protection of your cryptocurrency assets. By generating your own seed phrase with personal entropy, you minimize reliance on automated algorithms and reduce the risk of predictable patterns.
Important: Do not write down these words or take photos of them. At the end of the process, your complete seed will be generated, and you'll be able to encrypt the information onto a Cuvex NFC card.

Note: During the process, you may encounter an "invalid combination" message. This occurs whenever the coin flip results in tails and the sum of the dice exceeds 4362, as there are no words in the dictionary beyond that number. Simply re-roll the dice until you achieve a lower sum.
Let's continue...

When you have finished flipping the coin and rolling the dice 23 times, Cuvex automatically calculates the hash of the 24th word.

Next, you can add a passphrase. The passphrase is an optional word that acts as the 25th word, making your wallet more secure, as it adds an extra word known only to you in addition to the entropy of the 24 words. You now have the list of 24 or 25 words of your wallet created with true entropy.
To complete the process correctly, we need to encrypt the seed phrase onto an NFC card.
The device prompts whether you want it to be single-signature or multi-signature > Password > Repeat Password > Alias for the card of this wallet you have just created > bring a Cuvex NFC card that does not contain any previous information.


All set! You now have your wallet created with its own entropy on an NFC card with military-grade AES 256 encryption.
Welcome to sovereign and secure self-custody.
Step Nº2

Link cards to the app and activate Watch-Only Wallet to view real-time balances.


Link cards to the App
On the app’s home screen, you’ll see three sample cards. To view all available cards including the plain white one without a logo tap the “Link more cards” button.
Step 1: Select the color of the card that contains the secret, seed phrase, or BTC wallet previously encrypted with the Cuvex device.
Step 2: Tap “Link card” and hold the card near your smartphone’s NFC reader.


On the home screen, you'll see the linked card displayed with the same alias you assigned to it on the device.
When you access it, you'll get more information about the card, including its lifespan. You’ll also be able to export the binary code (a feature that allows you to decrypt your cryptogram using the Cuvex desktop app in critical situations where a Cuvex device is not available), activate the Watch-Only Wallet to view real-time balances and perform PSBT transactions, and delete the card if needed.
IMPORTANT: Deleting the card from the app does NOT erase the cryptogram stored on the physical card. You can always re-link it at any time using the original card.
Activate Watch Only Wallet ("WOW")


Step 1: Tap the “Watch-Only Wallet” button. You’ll then be prompted to assign a name to the account.
When you create an account, you're effectively creating a standalone wallet where transactions will never be mixed with those from other accounts.
We recommend choosing a name that clearly identifies the origin and intended use of your satoshis for example, “Personal” or “Business”.


Step 2: To view your balance in the app and perform PSBT transactions, you’ll need to link your Master Public Key the public key of your wallet.
Access it from your device by following these steps:
Decrypt → hold the card containing your wallet (created using the Cuvex Dice & Coin procedure) near the reader → enter your password, or passwords in case of a multisig wallet which only you know.
Once decrypted, tap the QR icon and select “QR PUBLIC KEY”. You can then scan the QR code using your smartphone’s app and that’s it, your Watch-Only Wallet is now active.


To access the new menu with Watch-Only Wallet enabled, tap the card. You’ll be able to access your wallet through two connection options:
Standard: This uses your smartphone’s default internet connection, which may expose private data such as your IP address during communication with the mempool necessary to retrieve balance information.
TOR: This option routes your internet connection through the TOR network a protocol designed to prevent third parties from identifying information like your IP address, thereby enhancing your privacy.
Note: TOR connections are not managed by Cuvex; we’ve simply enabled access to the TOR network. As a result, connection speeds over TOR may occasionally be significantly slower or even fail to establish at times.
Once inside, you’ll notice that the main menu now includes new features for full BTC wallet management.
Click here if you want to learn how to send transactions, receive BTC, manage your UTXOs, and more.
Step Nº3


The first thing you need to do is select which of your accounts you'd like to receive the Bitcoin in since you may have more than one.
Next, create a new address. (If you weren’t aware, BTC transactions are indeed traceable. That’s why we help you manage your privacy by giving you tools to properly label each one.) For every new address, you can assign the following metadata:
Observer: The person or entity sending you the satoshis, who will be able to permanently see how you spend the received funds. e.g.: Exchange Kraken
Amount: The expected value of the transaction. e.g.: 0.0227 BTC
Purpose: A clear reason for the incoming payment something you'll want to easily identify later. e.g.: Profit withdrawal
Important: These labels are not shared with anyone not even with Cuvex. They are stored securely within the trusted element of your smartphone. They're completely private, and only you have access to them. We highly recommend keeping a backup of these labels, which you can export directly from the Cuvex app.


You can create as many addresses as you need, although we recommend only generating new ones when you're actually going to use them. All your addresses will be listed on this same screen for easy reference.
Once inside a specific address, you’ll be able to view its full details, copy it, share it, or display the QR code so someone else can scan it and send you a transfer.
Important: We automatically highlight in yellow any addresses that have already been used. These already have an assigned observer, so you should avoid reusing them to receive Bitcoin from other observers. For better privacy and security, it's always best to create a new receiving address for each transaction.
Note: By default, we generate Bech32 Native SegWit addresses, which are optimized to incur the lowest possible fees on the Bitcoin network.
If you already have a balance in your wallet, you’re ready to start making PSBT double air-gapped transactions.
IF YOU’RE GOING TO RECEIVE A SIGNIFICANT AMOUNT OF BITCOIN, YOU CAN VERIFY THE RECEIVING ADDRESS TO ENSURE THAT YOUR PHONE HASN’T BEEN COMPROMISED AND THAT THE ADDRESS IS CORRECT.

Decrypt the card using your Cuvex device where your encrypted seed phrase is stored. Then, tap the top-left button "See QR" and select the "Verify Address" option.


Open your mobile app and tap on the receiving address you just created. At the bottom, you’ll find the Derivation Path. Enter only the last 3 numbers, separated by slashes. Example: 0/0/33.
Important: Make sure it’s a new address that hasn’t been used before.


Make sure the address displayed on your device screen is "exactly the same" as the one shown in the Cuvex mobile app.
Step Nº4

WALLET
MAIN MENU
SEND
Send Bitcoin. PSBT Transactions with Double Airgap.
ADMIN UTXOS
Manage your UTXOs. You can freeze and unfreeze them to execute your transactions. Avoid mistakenly sending high-value UTXOs to unintended observers.

RECEIVE
Create new receiving addresses in any of your accounts. Label them to enhance control and privacy.
TRANSACTIONS
Track all your transactions. Whether confirmed or pending, you can view all relevant details.
BROADCAST TRANSACTION
Send a transaction that has already been signed on your Cuvex device but has not yet been broadcast to the BTC network.
IMPORTANT: To complete this process, you must first create your wallet using the dice and coins procedure. This will generate the master private and public keys required to operate your PSBT Cuvex wallet.


Executing a PSBT Double Airgap transaction on Cuvex is a smooth and seamless experience. We help you strengthen your privacy with Coin Control features when sending and receiving BTC.
To get started, click the "Send" button and select the account from which you want to make the transaction. You will see your wallet balance, whether you have frozen UTXOs or not, and you can view your currency and choose a specific amount for the transaction or the maximum amount available in your wallet.
In Cuvex, transactions are marked as RBF (Replace-By-Fee) by default. This allows you to adjust the fee if it was initially set too low, and even modify the recipient, as long as you act before the transaction is confirmed in a block. You can disable this option if desired.


Next, the transaction is created by selecting the UTXOs. Remember, the key is to try to adjust the sum of the UTXOs plus the fee to minimize the resulting change.
Cuvex does this automatically, but you can always modify it and manually select the UTXOs you want to use in the transaction.
Enter the address provided by the recipient of the transaction. You can enter it manually, copy and paste it, or scan the QR code to prevent errors. Indicate the reason for the payment so you can always remember who you paid and for what purpose. These labels are only stored in the secure element of your smartphone. No one but you can see the "Reason" label you specify. Additionally, you can export these labels and keep a backup in case you need to restore your app on another smartphone.
Note: You can enter as many recipients as needed by specifying a new amount, address, and reason per recipient. This allows you to make multiple payments to different recipients in a single transaction, saving on fees.
Now, select the fee amount in sats. Keep in mind that the fee will depend on the speed you set for your transaction. Fee costs are dynamic based on network congestion. Sometimes, the app may display the same cost for all speed options. If the network is congested, you can choose to pay a higher fee to accelerate your transaction.


To finalize, you will see a complete summary of the transaction: Amount for the recipient(s), UTXOs being spent, receiving addresses, change addresses, and fees to be paid. If everything is correct, click the "Export to Sign PSBT" button. The app will prompt you to use a Cuvex transaction card.
Note: Assign one of your Cuvex cards or use the default one we sent "TX - PSBT" for transactions. Since it does not have a cryptogram recorded, you can reuse it for all future transactions. (You can use the same card for all transactions; Cuvex overwrites the previous transaction and keeps the current one).
Important: If the transaction involves multiple inputs or outputs, the app will require you to use an 8K card. Transactions with large data sets occupy more space and cannot be recorded on standard Cuvex cards.
If you attempt to use a Cuvex card that already has a recorded cryptogram, the app will notify you to use a new card. You cannot use the Cuvex card containing the cryptogram of your wallet's seed phrase for the Airgap process of sending an unsigned transaction to the Cuvex device.
In the app, you will see a message: "Successfully Recorded." At this point, the transaction has been recorded on the card. Now, you need to sign it using the Cuvex device.


Power on your device, access "PSBT," and place the same card on which you just recorded the transaction configured and copied from the app. Review the information, and if everything is correct, click the "Verify Transaction" button at the bottom. This is the first AirGap.


Cuvex will prompt you to place the card containing the cryptogram of your seed phrase and enter the password(s), depending on whether it is a single-signature or multi-signature wallet. This is the second AirGap.

Cuvex will display the transaction details and the recipient(s). If you agree with the information shown and wish to sign the transaction, press the "SIGN PSBT" button three times.
Once the transaction is signed by the Cuvex device, you have two options to broadcast it to the Bitcoin network:
1. Broadcast the signed transaction by scanning the QR code.
2. Broadcast the signed transaction via NFC recording.
Broadcast the signed transaction by scanning the QR code.


Once you have the QR code on your Cuvex device, go to the app, select the card from your wallet, and in the menu, click the "Broadcast Transaction" button at the bottom. Scan the QR code from the device, and that's it! Your transaction is now signed and broadcasted to the Bitcoin network. You can view it in the Mempool or track its mining and confirmation status from the Transactions button in the app.

Transactions marked as "unconfirmed" are those that have not yet been mined into the blockchain. Once the Bitcoin network completes this process, the transaction status will change to "confirmed," and the process will be complete.
Broadcast the signed transaction via NFC recording.
Important Note: Certain transactions, due to their size and complexity, cannot be read by the QR code scanner once they have been signed by the Cuvex device.
To broadcast these larger transactions, they must be re-recorded onto the Cuvex card you used to transfer them from the Cuvex App to the Cuvex device in the first step before signing.
The Cuvex device will prompt you with the option "Record PSBT via NFC." When you select this option, the device's NFC will activate, and you must place the same card used in the first AirGap. The signed PSBT transaction will be recorded onto this card.
Finally, return to the same button in the App, "Broadcast Transaction," and click "Read via NFC." The app will complete the process and broadcast the transaction to the Bitcoin network.


Transferencia recibida.
Entrada de BTC.
Transferencia enviada.
Salida de BTC.
From the "Transactions" menu, you can review all of them both sent and received. You'll see confirmations in real time, and if a transaction is still unconfirmed, you can access Mempool directly from there.


You’ll get full details for each transaction, including:
-
Status: whether it's confirmed or unconfirmed
-
Coin control labels (observer and purpose), if they were defined.
-
Timestamp, including date, hour, minute, and second the transaction was broadcast.
-
RBF flag: Whether or not the transaction is marked as "Replace-By-Fee", (which allows modification before being confirmed in a block).
-
Address type, e.g., Native SegWit
-
Transaction size "measured in bytes".
-
Number of inputs and outputs: Inputs refer to UTXOs spent by the sender(s), outputs are the receiving addresses involved.
-
Presence of external addresses, for example, when receiving BTC in a multi-recipient transaction, other people’s addresses may appear alongside yours.
-
Change address detection if you’re the sender and there's leftover change, it will be sent to a change address; when you're the receiver, the sender’s change address will appear as external.
-
Transaction fee cost: How many sats per vByte were paid as miner fees.

You can freeze UTXOs to prevent them from being used in outgoing transactions until you decide to unfreeze them.
This helps improve your privacy with respect to observers and ensures that you don't accidentally spend UTXOs you'd rather keep untraceable avoiding links between those funds and their future recipients.
How can you freeze UTXOs?


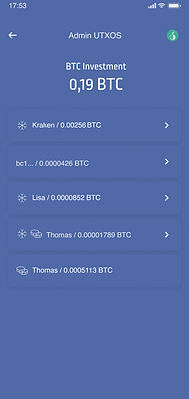

From the "Admin UTXOs" menu, you can perform this action at any time.
Here you'll find a complete list of all the UTXOs in your wallet that are available for transactions.
Tap on the UTXO you want to manage you’ll be able to freeze it to prevent it from being used in outgoing transactions, or unfreeze it if you want to make it spendable again.


In this example, even though your wallet shows a total balance of 0.19 BTC, you can only send one or more transactions totaling up to 0.16 BTC, because you have a frozen UTXO worth 0.03 BTC.